
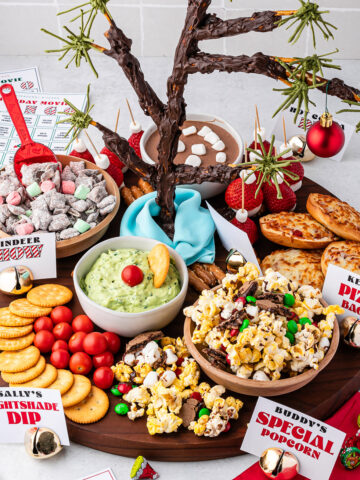
Part of Our Holiday Movie Snack Board
Growing up the number one holiday movie in our household year-after-year was Charlie Brown’s Christmas, and this Charlie’s Sad Tree recipe is our homage to the classic film. The assembly of this piece takes a good deal of time and patience, but the result is a show-stopping centerpiece for your holiday party or get-together. Enjoy snacking on this tree with your family and friends while you contemplate the true meaning of Christmas.
Our love of holiday movies inspired us to create some easy and delicious recipes based on a few of the classics from our childhoods. You can see all these recipes come together in our Holiday Movie Snack Board. Happy Holidays from our family to yours! And happy snacking!

We added 1-2 regular chocolate wafers to the white chocolate to create a pale brown base. Then when we added the matcha, the color was more earthy. We also added a drop of oil-based green food color to make the green pop a little more.

Preparing the Elements:
Start by parchment lining 3 baking sheets. Melt the white chocolate in the microwave in 20 second increments until melted. Stir in the matcha powder to create a green color. Place the chocolate into a zipper bag or piping bag. Cut the tip creating a small hole.

Pipe out 1-inch lines to create the needles of the pine tree. Make a lot because some will break. Use about 70% off the chocolate, saving some to use as glue to fuse the needles together. Allow the needles to harden and cool.

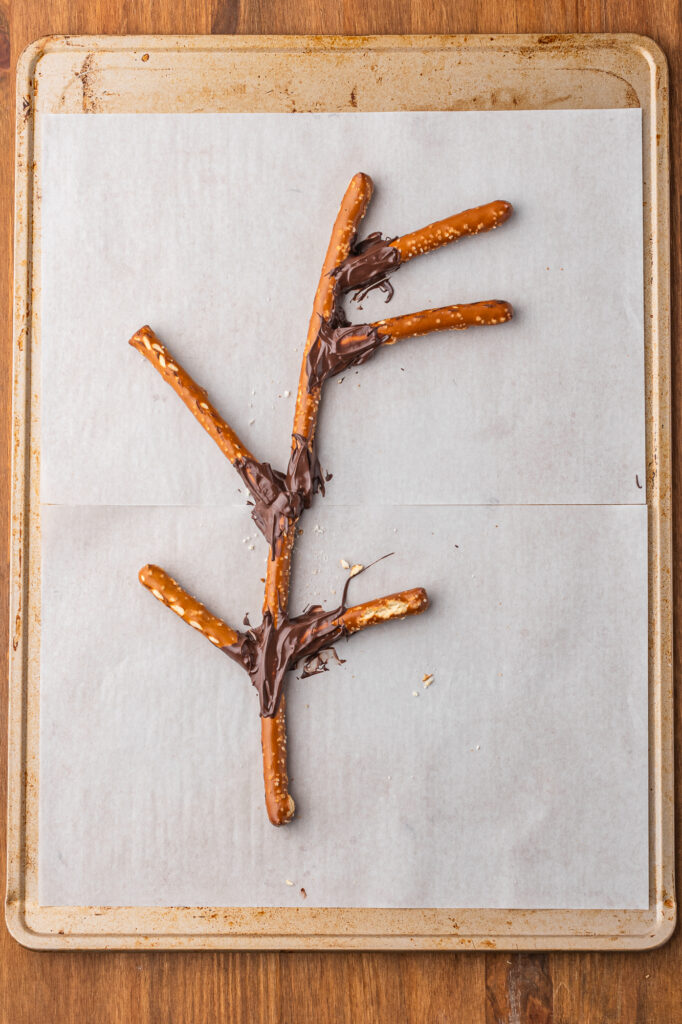
On the second sheet, lay out your tree shape using pretzel rods. Include side branches and a dropping branch. Break the rods up as necessary to create the shape you want. Then melt the semi-sweet chocolate chips in the microwave in 20 second increments until melted. Fuse the pretzel rods together using the chocolate as glue to hold the pretzels together. Use a lot so the tree will be sturdy. Allow the section to cool and harden.
On the third sheet, create an x-shape using 4 pretzel rods as a support base for the tree. Break 2 rods in half to make the x-shape. Do not connect the center rods, as the tree will need to fit in the middle. Use the chocolate to fuse the smaller pieces to the larger ones and set aside to harden.

Using the pretzel sticks and green chocolate, attach the needles to the tip of the pretzel sticks to form the branches. You will add more needles at the end to fill in gaps, so don’t use all the needles. Allow them to harden.

Assembling Charlie's Sad Tree:
Take two more pretzel rods and break one in half and one into four pieces. Place the tree base into the center of the x-shape and take the 2 pretzel rod sticks and fit them on the inside of the tree base. Use a lot of chocolate to secure the tree and hold while it hardens. Then take the 4 pieces of pretzel and stack them on top of the x-base to give the tree even more support. Coat in chocolate to secure the tree. When it hardens, it should be pretty sturdy.

Attach the needled branch pieces to the ends of the branches on the tree with chocolate. This can take a little bit of time as the branches harden. Coat the whole tree in chocolate to blend together.
Add a drop of blue food color to the fondant and knead. Roll out the fondant into a thin and long oval shape. Gently drape the oval at the base of the tree, creating a blanket. Then add the red ornament to the branch that is leaning down.

Charlie's Sad Tree FAQS:
You will need the following ingredients:
Pretzel rods, pretzel sticks, white chocolate chips/wafers, matcha powder, semi-sweet chocolate chips/wafers, white fondant (optional), blue food coloring (optional), small red ornament (optional)
You will need the following supplies:
Baking sheets, parchment paper, microwave safe mixing bowls, piping bag or resealable plastic bag
Break apart any leftover tree pieces and store in a resealable container or wrapped in plastic. Store on the counter and eat within two days.
Charlie's Sad Tree is best enjoyed room temperature after having time to harden.
Charlie's Sad Tree Notes:
- We added 1-2 regular chocolate wafers to the white chocolate to create a pale brown base. Then when we added the matcha, the color was more earthy. We also added a drop of oil-based green food color to make the green pop a little more.
- Make sure you are allowing the chocolate to harden fully between each step, so the tree is secure.
- This is a labor of love, so take your time and enjoy the process. Building out the needles and branches can take some time, so don’t rush.
- When cutting the piping bag, make the hole small enough that the needles resemble an actual pine tree and not so thin, that they will break. Start small and do a test, you can always cut a bigger hole as needed.
- Break apart any leftover tree pieces and store in a resealable container or wrapped in plastic. Store on the counter and eat within two days.

Charlie's Sad Tree
Ingredients
- 20-22 pretzel rods
- 10-12 pretzel sticks
- ½ cup white chocolate chips/wafers
- 1 tablespoon matcha powder
- ½-3/4 cup semi-sweet chocolate chips or wafers
- Small piece of white fondant (optional)
- Blue food color (optional)
- Small red ornaments (optional)
Instructions
- Start by parchment lining 3 baking sheets. Melt the white chocolate in the microwave in 20 second increments until melted. Stir in the matcha powder to create a green color. Place the chocolate into a zipper bag or piping bag. Cut the tip creating a small hole.
- Pipe out 1-inch lines to create the needles of the pine tree. Make a lot because some will break. Use about 70% off the chocolate, saving some to use as glue to fuse the needles together. Allow the needles to harden and cool.
- On the second sheet, lay out your tree shape using pretzel rods. Include side branches and a dropping branch. Break the rods up as necessary to create the shape you want.
- Melt the semi-sweet chocolate chips in the microwave in 20 second increments until melted. Fuse the pretzel rods together using the chocolate as glue to hold the pretzels together. Use a lot so the tree will be sturdy. Allow the section to cool and harden.
- On the third sheet, create an x-shape using 4 pretzel rods as a support base for the tree. Break 2 rods in half to make the x-shape. Do not connect the center rods, as the tree will need to fit in the middle. Use the chocolate to fuse the smaller pieces to the larger ones and set aside to harden.
- Using the pretzel sticks and green chocolate, attach the needles to the tip of the pretzel sticks to form the branches. You will add more needles at the end to fill in gaps, so don’t use all the needles. Allow them to harden.
- Take two more pretzel rods and break one in half and one into four pieces. Place the tree base into the center of the x-shape and take the 2 pretzel rod sticks and fit them on the inside of the tree base. Use a lot of chocolate to secure the tree and hold while it hardens. Then take the 4 pieces of pretzel and stack them on top of the x-base to give the tree even more support. Coat in chocolate to secure the tree. When it hardens, it should be pretty sturdy.
- Attach the needled branch pieces to the ends of the branches on the tree with chocolate. This can take a little bit of time as the branches harden. Coat the whole tree in chocolate to blend together.
- Attach extra needles to the tree to make it more 3-D and fill in any holes.
- Add a drop of blue food color to the fondant and knead. Roll out the fondant into a thin and long oval shape. Gently drape the oval at the base of the tree, creating a blanket.
- Add the red ornament to the branch that is leaning down.
Notes
- We added 1-2 regular chocolate wafers to the white chocolate to create a pale brown base. Then when we added the matcha, the color was more earthy. We also added a drop of oil-based green food color to make the green pop a little more.
- Make sure you are allowing the chocolate to harden fully between each step, so the tree is secure.
- This is a labor of love, so take your time and enjoy the process. Building out the needles and branches can take some time, so don’t rush.
- When cutting the piping bag, make the hole small enough that the needles resemble an actual pine tree and not so thin, that they will break. Start small and do a test, you can always cut a bigger hole as needed.
- Break apart any leftover tree pieces and store in a resealable container or wrapped in plastic. Store on the counter and eat within two days.
Did you make this recipe?
If you enjoyed this recipe, please leave a comment, a review, or a rating.


Leave a Reply